Who else has a major crush on those Plush Velvet Pumpkins floating around blogland? Me Me Me!
I had this in my head since last year, and was finally able to make my own Plush Velvet Pumpkins this weekend.

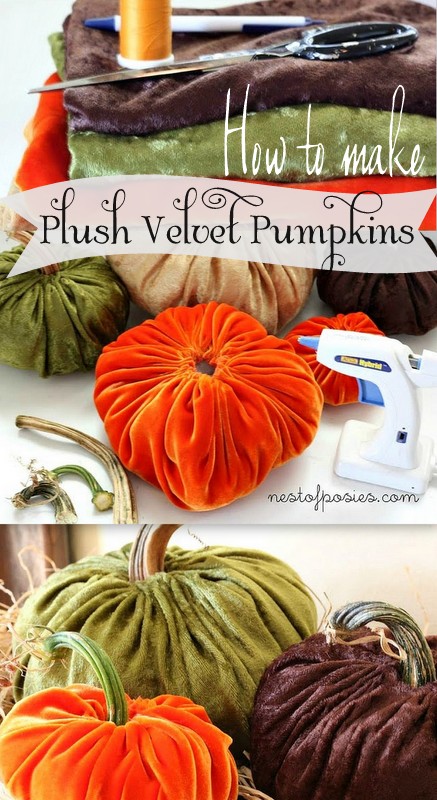
I couldn’t believe how easy they were to make, once I had all the supplies.
Supplies needed:
Velvet fabric (I found mine on eBay for cheap)
scissors
thread
needle
pen
~also *shown below*
*vines or stems from real pumpkins
*glue sticks & glue gun
*stuffing
*beans
*Lay your fabric out & draw with your pen various size circles.
*Cut your circles
Now thread your needle & watch this video. Goodness gracious – I can’t believe I’m showing this. (just so you all know, I’m in my jammies making this. lol)
But it was the fastest way to demonstrate just how EASY they are to make to some of you who don’t like to stitch or sew.
I’m not a video pro, so be kind. I’m sensitive. 😉


Oh my goodness – so adorable Kellie!! I have a big crush on them!
xoxo
Jen
So gorgeous! Do the stems keep without getting moldy? Did you tear the stems off of fresh pumpkins and let them dry? The stem part confuses me, but I love these and really want to make some!
That’s pretty dang awesome, especially considering those can go for almost $50 in boutiques!
Great Pumpkins! I love them!
AmAZING… I love your pumpkins!
I stared at these things a couple of weeks ago until I figured it out too!
I bought my stems from ebay where they are already dried and no insects within! They are gorgeous and I have been a pumpkin making factory !!!!
Thanks for sharing!I need to get to the pumpkin patch & find some pretty velvet.I cut a black velvet dress for some black ones! lol 😉 Theresa
I have loved these from afar for ages since seeing them last year and would love to make me some- I have a ton a velvet stored away for a quilting project that has yet to happen so just need to get started. On my flower pumpkin I found that sun flower stalks look very much like pumpkin stems and used it.
bee blessed
mary
They are adorable! 😀
Just adorable!!! Thanks for sharing.
Kellie, you are my new hero! I am so on this project! Thanks for breaking it down for us non-sewing decor lovers. 🙂
xo Heidi @ Show some Decor
I love these! I may have to try some, they are so classy looking!
Thanks,
Debbie
So adorable! I see a trip to the fabric store in my near future 🙂 Thanks for sharing!
So Pretty, I pinned this one! Great job! Love velvet!
I love these! Thanks for sharing!
I love, love, love these!!
I love these! Classy pumpkins 🙂
These are just precious!!! —and super cute, too! 🙂
I am with you in the crush department. Looks great! They are adorable!
~ Meredith From A Mother Seeking Come find me on my blog, A Mother Seeking…
Cute cute cute!!!! Thank you sooo much for the tutorial! I’ve been swooning over these in blogland all month! 🙂
xoxo laurie
very creative….love it !
I looove these Kellie!! 🙂
LOVE, LOVE, LOVE these velvet pumpkins! Yes, I’ve seen them in blog world and am so EXCITED you took the time to let us know how EASY these are to make! Can hardly wait to get started!
This comment has been removed by the author.
Very nice! Great tutorial!
These are just adorable! If you run out of stems, corks from wine bottles might also do the trick!
Stop by to enter my giveaway for 100 printed postcards!
This is the post everyone has been waiting for- how to make velvet pumpkins! I have seen them around and wondered. Now I know. Thanks for the great tutorial!
🙂 crafty texas girls
LOVE these!! Fun story about how you got your stems, too. 🙂 A woman on a mission! 🙂 I have some pumpkins I painted I’m having a giveaway for right now. I bet one would look nice with your velvets. I’m new here, through TaterTots link party. Also, I bet velvet type material might be found at a GoodWill store or something. That orange might be well nigh impossible to come by, though. 🙂
Gorgeous! I’ve always loved the look of velvet pumpkins – thanks for the easy tutorial!
GORGEOUS!
thank you so much for sharing these instructions–you are so talented and patient–a real super mom–
I wish this was 22 years ago when I was a young mother
bravo
I LOVE these…saw them in Canton last fall and wanted to try to make them. I actually got a ton of free stems at the grocery store that had fallen off pumpkins…they just gave them to me.
super cute! I love how lush the velvet looks!
Gorgeous colors! So lovely and cozy!
Kellie, nice job on those pumpkins! I’ve been thinking I need to buy some too, but thanks to you now I can make my own! You rock! And, your video was perfect 😉
Brittany aka Pretty Handy Girl
OH MY! Those are AMAZING! They are just perfectly gorgeous! 🙂 You did a lovely job on them! Thank you for sharing how you made them. 🙂
Blessings,
Jenni
Though I’m way past “the season”, belated thanks for your wonderful instructions!!! I am SO excited to make my own now (the challenge will be obtaining pumpkins stems)! I bought one from Rachel Ashwell’s Shabby Chic couture website in November, and even at 50% off with free shipping, an 8-inch one was $27! I absolutely love it, but yours are every bit as gorgeous and now I can make my own in colors like pale gray, white, French blue, soft aqua …. I am beside myself that I’ll be able to make my own big “pumpkin patch” and make some as gifts, too! Thank you, thank you, thank you!!!
I love these! Making a couple to send my sister who is living out of the country right now. Thanks for sharing!
Velvet pumpkins with Real pumpkin stems ! I found them here too:O)
http://www.shorecrafty.etsy.com
Your velvet pumpkins have inspired me to make my own! I featured them on my Saturday favs-Have a lovely weekend- Claire
I love these! XO, Aimee
I have been saving 3 stems froms pumpkins since last year. I’m so happy to find this tutorial so I can finally make some for this year.
LOVE these pumpkins, thanks for sharing, I’ve been making a few of my own but with just regular fabric and corduroy, I’ll have to try velet! 🙂 xo Holly